eufy SoloCam S340 Setup: Easy Mount, Flexible Coverage
The eufy SoloCam S340 was straightforward to pair, mount, and aim. Its separate solar panel, dual view, pan/tilt controls, and presets make placement much less rigid.
Affiliate disclosure: As an Amazon Associate I earn from qualifying purchases. This article may contain affiliate links, which means I may earn a commission at no extra cost to you.
The eufy SoloCam S340 is easy to set up, easy to mount, and much more flexible than a fixed outdoor camera. That is the short answer. I paired it in the eufy Security app, mounted the bracket on my shop, clicked the camera in place, and had a live dual-camera view on my phone. No complicated wiring project. No wrestling with the camera while trying to line up screw holes.
A strong DIY choice if you want flexible outdoor coverage without a complicated install. The click-on bracket, separate solar-panel cable, dual view, pan/tilt controls, and presets make the SoloCam S340 especially easy to place and manage.
As an Amazon Associate I earn from qualifying purchases.
| Camera type | Solar-powered outdoor dual-camera security camera |
|---|---|
| Installation | DIY bracket-first wall mount |
| Solar flexibility | Panel mounts on-camera or separately with included longer cable |
| Live controls | Dual/single view, 1x/3x zoom, pan, tilt, and 360-degree movement |
| Motion tools | Human, vehicle, and other-motion filters; sensitivity control; AI tracking |
| Connection setup | Paired to Wi-Fi by app-generated QR code; HomeBase option shown in app |
For homeowners who want an outdoor camera they can install themselves, this is a smart design. The big advantage is not just the solar panel. It is that the panel can live on the camera or move elsewhere with the included longer cable. That matters when an eave, roofline, or shade turns the obvious mounting location into a bad solar location.
Who the eufy SoloCam S340 setup makes sense for
I would look at this camera if you want broad yard, driveway, garage, or side-yard coverage and do not want to run power wiring. It is also a good fit for first-time eufy installers because the app pairing was straightforward in my setup.
- Homeowners who want a DIY outdoor camera installation.
- People who want to check two views at once from one camera.
- Anyone who needs to aim a solar panel separately from the camera.
- Users who want remote pan, tilt, tracking, and saved viewing positions.
If your goal is only to watch one narrow, fixed spot, this may be more camera than you need. But if you need to look around a yard instead of committing to one permanent angle, the pan-and-tilt controls change the equation.
Setup was simple because the app and mount do the work
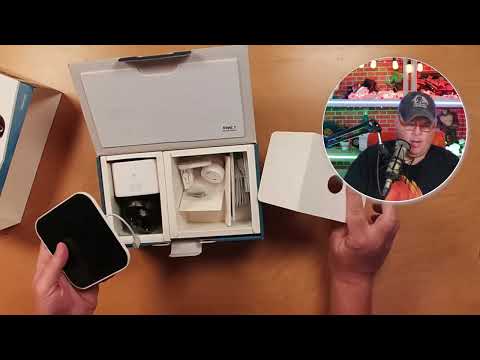
I like setting cameras up indoors first, close to the router, before climbing up to install anything. That is exactly how I handled the SoloCam S340. In the box, I found the camera, separate solar panel, mounting bracket, screws, USB-C charging cable, longer solar-panel connection cable, instructions, and a placement sticker/template.
That placement template is a small thing, but it is useful. Put it where the bracket needs to go, mark the mounting location, install the bracket, then line up the camera and click it on. Simple. The bracket-first design means I did not have to hold the entire camera assembly in place while trying to drive screws.
Before pairing, I removed the protective stickers around the camera, including the ones covering the ports and sync area. The sync button is on the rear, and the charging/solar connection sits behind its cover.
Inside the eufy Security app, I selected Battery Camera, chose the SoloCam S340, entered my Wi-Fi credentials, pressed the sync button, and scanned the QR code generated by the app. The camera gave a loud beep when it entered pairing mode, and setup completed successfully. The app also checked my Wi-Fi signal at the chosen location and reported it as good.
I connected mine directly to my router because it was close by. The app also presented a HomeBase connection option. During initial setup, I installed the available firmware update, which completed successfully.
Solar-panel placement is the practical win
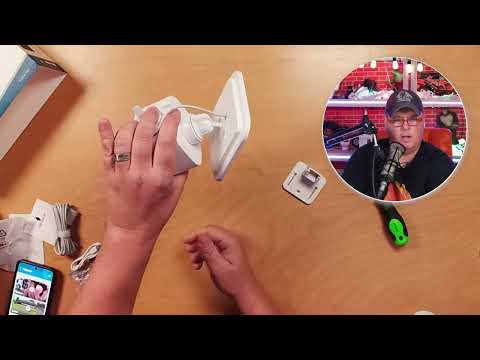
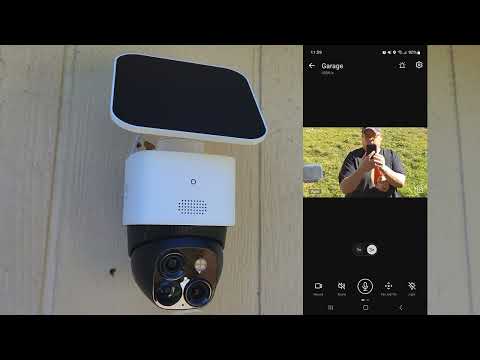
The supplied panel can attach directly to the camera assembly, which is the cleanest setup when the camera gets good sun. I assembled that mount before going outside, then attached the panel with its cable positioned at the top.
But the separate, longer panel cable is the feature worth paying attention to. If the camera has to sit beneath an eave or another spot where the panel cannot get enough light, you can mount the panel separately. That gives you more freedom to put the camera where coverage is best rather than where sunlight happens to be easiest.
The app’s setup guidance recommends fully charging the camera before installation and says this takes about eight hours. I saw that instruction in the setup flow; I did not run a full charging or long-term solar-runtime test.
Dual view, pan and tilt, and presets make coverage flexible
Once mounted, I opened the live feed and got a top-and-bottom dual-camera view. If I wanted a simpler screen, I could switch the app to a single-camera view. I also had 1x and 3x zoom controls available.
The real point of this camera is control. From the app, I moved the view side to side and up and down with pan-and-tilt controls. I also ran its 360-degree movement control. The camera rotated around, including back toward the wall where I mounted it, then returned to its earlier position.
That result is a useful placement reminder: where you mount the SoloCam S340 affects how much of that 360-degree movement is actually useful. On my shop wall, part of its travel looked back toward the structure. Under an eave or from a different mounting position, it could see more open space.
I also tried AI tracking, and the camera followed me as I moved around the yard. That is exactly what you want from a movable outdoor camera. A fixed camera catches whatever is inside its original frame. This one can follow motion through more of the space.
Presets were another standout. I saved camera positions, including a zoomed-in 3x position, and set a preset as the default. So instead of repeatedly nudging the controls to look at the back door, yard, or another specific area, I could tap a saved position and have the camera move there automatically.
The app gives you the controls that matter
The app was not just a live-view screen. I could use the built-in light, manual recording, screenshots, two-way talk, and night-vision controls. I enabled the microphone and speaker during setup so I could hear people and speak through the camera.
For motion detection, the settings offered filters for humans, vehicles, and all other motion. I could adjust detection sensitivity and run a motion test. For my backyard, I set it to human detection because I do not need every bit of general movement triggering activity.
There are also spotlight controls for brightness and behavior, pan-and-tilt calibration, and audio settings such as speaker volume, microphone control, and audio recording. It is a lot of adjustment without feeling like a mess.
One battery tradeoff is clear: color night vision uses more battery than black-and-white night vision. If runtime is your priority, that is worth keeping in mind. I did not assess night image quality in a dark outdoor setting, so I would not buy this based on an assumption about low-light detail alone.
+ Pros
- Bracket-first mounting lets the camera click into place after the wall bracket is installed.
- Included placement template makes bracket positioning easier.
- Separate solar panel can be mounted remotely with the included longer cable.
- QR-code app pairing was straightforward in my setup.
- Dual live view can be switched to a single-camera view.
- Remote pan, tilt, 360-degree movement, AI tracking, and presets offer flexible coverage.
- App controls include zoom, spotlight settings, two-way audio, recordings, screenshots, night vision, and motion filtering.
! What to know
- Your mounting surface takes up part of the camera's possible 360-degree viewing area; placement under an eave or farther from a wall may provide more useful coverage.
- Color night vision uses more battery than black-and-white night vision.
- The setup flow recommends fully charging the unit before installation and states that this takes about eight hours.
What I would plan before mounting
Do a quick coverage check before you drill. Think about the primary area you want to watch, the places you may want to save as presets, and where sunlight will hit the solar panel. The camera can move, but it cannot see through the wall behind it. Obvious point, yet it is easy to get distracted by “360 degrees” and forget the mounting surface takes up part of that circle.
I would also pair it near your Wi-Fi first. The QR-code process was easy, and the app confirmed signal strength at my location. Getting the app, firmware, and basic settings handled before mounting makes the outdoor portion much faster.
Specs
| Spec | Detail |
|---|---|
| Product | eufy SoloCam S340 |
| Camera views | Dual-camera live view with selectable single-camera mode |
| Zoom controls | 1x and 3x |
| Movement controls | Remote pan, tilt, 360-degree function, and calibration |
| Solar hardware | Separate solar panel and longer panel connection cable included |
| Mounting method | Wall bracket installed first; camera clicks onto bracket |
| Audio | Two-way audio with microphone, speaker volume, and audio-recording controls |
| Motion settings | Human, vehicle, and other-motion options with adjustable sensitivity |
| View positions | Saveable presets and default-preset option |
| Setup charging guidance | App recommends a full initial charge; setup flow states about eight hours |
Should you buy the eufy SoloCam S340?
Yes, if you want an outdoor security camera that is built around flexible placement and remote coverage control. The SoloCam S340 gave me a clean bracket-first install, an adjustable solar-panel arrangement, dual live views, pan and tilt, AI tracking, and useful presets. That is a very practical package for watching a yard or the outside of a garage.
I would not treat solar charging, long-term battery life, weather durability, Wi-Fi range, motion-alert accuracy, or night image quality as settled based on my initial setup and control testing. Those are longer-term ownership questions. But on the things I did use—installation, pairing, live view, movement controls, and app settings—the camera was simple and capable.
Scorecard
Template and click-on bracket keep mounting simple.
Separate solar-panel cable is genuinely useful around eaves.
Pan, tilt, presets, spotlight, audio, and motion tools are comprehensive.
Dual view, tracking, and movement offer far more flexibility than a fixed camera.
Useful clip-length modes, though color night vision uses more battery.
Frequently asked questions
Can the eufy SoloCam S340 solar panel be mounted away from the camera?
Yes. I found a longer solar-panel connection cable in the box, so the panel can be mounted separately when it cannot sit directly on top of the camera.
Does the SoloCam S340 have pan and tilt controls?
Yes. I used the app’s pan-and-tilt controls to move the camera side to side and up and down. It also has a 360-degree movement control and calibration settings.
Can I save favorite views on the eufy SoloCam S340?
Yes. I created multiple preset positions, including a 3x zoomed-in view, and selected a default preset for the camera.
Does the eufy SoloCam S340 have two-way audio?
Yes. I enabled the microphone and speaker in setup, and the app includes a talk control along with speaker-volume and audio-recording settings.
Can I filter motion alerts by people or vehicles?
Yes. The motion-detection menu includes human, vehicle, and other-motion options, plus adjustable sensitivity and a test control.
Final recommendation
The eufy SoloCam S340 is a good pick for the person who wants a solar-powered outdoor camera without locking themselves into one stiff camera angle. Mount it where it makes sense, put the panel where the sun makes sense, then use pan, tilt, tracking, and presets to cover the space. That is the practical advantage here.
As an Amazon Associate I earn from qualifying purchases.